


How to install the Nvidia proprietary driver in CentOS
How to install the Nvidia proprietary driver in CentOS
I will demonstrate the installation of the latest Nvidia driver on my LG RD510 laptop that runs a 64-bit edition of CentOS 6.0 and, as it happens, comes equipped with a still fairly handsome 9600M GS card, with 512MB RAM. We will learn how to get the necessary tools for building the driver, how to resolve a conflict with the default Nouveau driver, some command line work, and a few more tricks. It should be enlightening.
Manual method (the hard way)
This procedure is required if you do not feel like using external repositories or may be facing conflicts with repository priorities. Moreover, you might opt for this method if you must have the latest and greatest Nvidia driver, which is available from the official website, but which may not yet have landed in the repositories.
Step 1: Download the driver
Head to Nvidia site and download the driver. Very simple.
Step 2: Update your system & build tools
It is important to fully update your system before proceeding with the driver installation. The reason for this is that your running kernel may be older than the kernel source available in the repositories, so this will cause compilation conflicts.
Therefore, first max. update the system:
yum update
Reboot if necessary for your latest kernel to load. Then, install kernel source, kernel headers, make and gcc, just like in the good old times!
yum install kernel-devel kernel-headers gcc make
Compare your running kernel with the installed source:
uname -r
rpm -q kernel-devel
If the two do not match, upgrade and reboot until they do:
yum -y upgrade kernel kernel-devel
Once this step is complete, we can move on.
Step 3: Blacklist Nouveau
The Nouveau driver ships with CentOS, enabled by default. It’s this driver that allows the fancy high-resolution boot splash and whatnot. If you want Nvidia, then you will have to remove this driver first.
This can be accomplished in several ways. The quickest and simplest way is to add a small entry to the kernel line in the GRUB menu.lst file. Just append rdblacklist=nouveau and the next time your kernel boots, it will come with the old, low-resolution Plymouth three-color bar splash and no Nouveau. The second, more permanent option is to blacklisting the module is by using the /etc/modprobe.d/blacklist.conf file. Moreover, please consult my Linux commands article for details on how to achieve this.
However, during the testing, I would recommend you only change the GRUB menu. This way, if something goes wrong, you will be able to revert the changes even if your system cannot boot. Simply edit the GRUB menu and add/remove whatever you may have changed. Otherwise, you might need to boot into the single mode or from live CD and then change the blacklist.conf file.
kernel /boot/vmlinuz <all kinds of options> rdblacklist=nouveau
Once the system boots, verify that the driver is not loaded:
/sbin/lsmod | grep nouveau
Step 4: Install Nvidia proprietary driver
Now, we need to drop to text-only console, because the driver cannot install when the graphics thingies are in use. To do this, switch into runlevel 3:
init 3
Login as root. Find the downloaded Nvidia driver on your disk. Make the file executable and then run it. Follow the prompts provided by the Nvidia installer text wizard.
chmod +x <Nvidia file>.run
./<Nvidia file>.run
Once this step is complete, go back into runlevel 5.
init 5
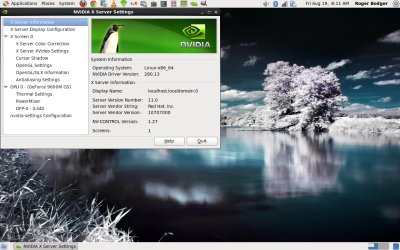
You will see Nvidia splash, which should indicate you’re doing good. But just to be sure, open the Nvidia control panel and make sure the driver is working correctly. Testing Compiz and a few games is also a good idea.
Step 5: Test
And now we have some fun!


Caveats
You will need to recompile your driver every time there’s a kernel update.